Local GPT-OSS 120B Serving on DGX Spark with sparkrun
In this tutorial, you will run a large language model on a single or multiple DGX Sparks using sparkrun.
Spark can be used directly as a computer by connecting a monitor and keyboard, or as a server accessed remotely from another computer. In this tutorial, we will connect to the Spark remotely, install the necessary software, and run the model.
We will use GPT-OSS 120B as the language model (a Mixture-of-Experts model with 117 billion parameters, 5.1 billion active parameters, mxfp4 quantization), vLLM as the inference engine, and sparkrun as the management tool. vLLM will load the model’s trained weights into GPU memory and run them, serving an API that accepts external requests. sparkrun will manage Docker containers and model distribution across Sparks via the command line. This automates image synchronization, model transfer, and cluster configuration. Both will run on the Main Spark, inside Docker containers.
This tutorial consists of three parts:
- Setup: sparkrun installation, Docker image build, cluster configuration, and recipe creation
- Running with a Single Spark: Starting, monitoring, and testing the model on a single Spark
- Running with Two Sparks: Running the model split across multiple Sparks (tensor parallelism) and comparing performance
If you have a single Spark, review the “Setup” and “Running with a Single Spark” sections. If you are using multiple Sparks, you can proceed directly to the “Running with Two Sparks” section after “Setup”.
If you are using multiple Sparks, note that throughout the tutorial the primary device will be referred to as the Main Spark, and the other devices as Worker Sparks.
Setup
1. Connecting to the Spark
If you are connecting to the Spark remotely for the first time, you need to find its IP address. Connect a monitor and keyboard to the Spark, log in, and run the following command from the terminal:
The command returns the IP address of the Spark’s default network interface:
Note this address; throughout the tutorial you will use it in place of . Alternatively, you can find the IP address by checking the NVIDIA Sync application.
If you are using multiple Sparks, repeat this step for every other device and note the addresses. You will use them in place of
throughout the tutorial.
If you are using multiple Sparks, ensure the same username is used on all Sparks. sparkrun requires matching usernames when setting up passwordless SSH between devices. The default DGX OS username is
nvidia. Check your username on each Spark:
If the username is not
nvidia, create this user on all Sparks:
These commands: create the user, add them to the sudo group, set a password, and switch to the new user. Ensure the same username exists on all Sparks.
If you are using multiple Sparks, connect the devices to each other with QSFP cables. The cable can be plugged into any of the CX-7 ports on each Spark. To verify the connection, log in to each device with a monitor and keyboard and run the following command:
Those shown as
(Up)are the ports where the cable is connected. Those shown as(Down)are unused ports. If no interface shows as(Up), check the QSFP cable and restart the Sparks.
Ensure your computer is connected to the same network as the Spark. Then, open a terminal on your computer and connect to the Spark via SSH:
On the first connection you will see a fingerprint warning. Type yes and press Enter. Then, when prompted for a password, enter the Spark’s password:
Once connected, the Spark will begin accepting commands sent from this terminal. Throughout the tutorial, you will enter all commands you encounter into this terminal on your computer.
2. Installing sparkrun
First, download the uv package manager:
Add uv to your PATH:
PATH updated. The ~/.local/bin directory (where uv and sparkrun are installed) is now available and has been added to the PATH for all future terminal sessions. Now install sparkrun:
Let’s verify the installation:
sparkrun v0.2.40 is installed and accessible.
3. Building the Docker Image
To get the best performance from GPT-OSS 120B, we will build a Docker image that contains CUTLASS MoE and FlashInfer attention kernels compiled specifically for the Spark’s GPU architecture. This image also includes the --mxfp4-backend, --mxfp4-layers flags and GPT-OSS’s tiktoken encoding files.
We will build this image using the build-and-copy.sh script from the eugr community project. First, clone the eugr repository:
The Dockerfile.mxfp4 file in the repository determines the version of the source code that build-and-copy.sh will compile. Before starting the build, we must ensure this version is up to date. Therefore, let’s query the latest commit hash of the mxfp4_v2 branch in christopherowen’s community project vLLM fork:
This hash returned by the command will direct build-and-copy.sh to the latest version of the vLLM source code we want. Copy or note it. Then open the Dockerfile.mxfp4 file with nano:
Once the file is open, press Ctrl+W to search within the file, type VLLM_SHA and press Enter. The cursor will land on a line similar to:
Delete the old hash value and paste the updated hash you noted above. Then press Ctrl+O to save the file, confirm with Enter, and exit nano with Ctrl+X.
Let’s verify the change we made to the Dockerfile.mxfp4 file:
The returned hash value should be the updated hash you copied in the previous step.
Fallback: If you experience issues with the latest commit, you can use the hash 04f641e537e80a67db464c6e65b928dbfab5d647 (January 28, 2026), which we have tested and confirmed. You can also check for newer commits in the commit history .
Now build the image:
The first build takes approximately 50 minutes; subsequent builds complete in about 5 minutes thanks to caching. When the build completes, you will see the following output:
Verify the image:
Verify the image’s vLLM version:
If you are using multiple Sparks, building the image only on the Main Spark is sufficient. sparkrun will automatically synchronize the image to the Workers over the CX-7 network on first launch. No additional step is needed.
4. Setup Wizard
The sparkrun setup wizard configures all the infrastructure needed to run the Spark with a single interactive command:
Six phases run sequentially, and the phases are interactive. In the first phase, enter in the ‘Enter host IPs/hostnames’ field and press Enter. For the subsequent prompts, you can simply press Enter (confirming the default options) to continue:
If you are using multiple Sparks, enter all the Sparks’ IP addresses separated by commas in the ‘Enter host IPs/hostnames’ field .
The second phase sets up passwordless SSH. Type Y and press Enter:
If you are using multiple Sparks, the wizard connects to the Worker Sparks via SSH during this phase and asks for the password. Enter the password — this step is done once; after the wizard distributes the passwordless SSH keys, no password will be asked for in subsequent connections.
The third phase configures the CX-7 high-speed network interfaces. It is automatically skipped if a single Spark is used. Type Y and press Enter:
If you are using multiple Sparks, the wizard automatically detects CX-7 interfaces, selects non-overlapping subnets, assigns a static IP to each Spark, sets MTU 9000 (jumbo frame), and writes the /etc/netplan/40-cx7.yaml file and applies it with netplan apply. This operation requires root privileges — enter the sudo password.
After CX-7 configuration, the wizard automatically refreshes the SSH network with the new IPs. This phase requires no additional input.
The fourth phase verifies that the user is in the docker group. Type Y and press Enter:
The fifth phase installs restricted sudoers rules. The installed rules are for passwordlessly fixing HuggingFace cache ownership and passwordlessly clearing the Linux page cache. Broad sudo privileges are not granted. Type Y and press Enter:
The sixth phase installs earlyoom OOM protection. earlyoom terminates inference processes instead of locking up the system when memory limits are approached in the DGX Spark’s unified memory architecture. Type Y and press Enter:
5. Creating the Recipe
A recipe is a YAML file that defines how sparkrun runs the model. The model, Docker image, vLLM flags, and memory settings are consolidated in a single file. This recipe can be used for both a single Spark (TP=1) and multiple Sparks (TP>1) — the only difference is that the --tp value in the launch command is adjusted according to the number of Sparks.
Verify the file:
Key fields in the recipe and the reasons they were selected:
container- Value:
vllm-node-mxfp4 - Why: Image built in step 3 — includes the CUTLASS/FlashInfer forks
- Value:
tensor_parallel- Value:
1(default) - Why: Default for a single Spark; overridden with the
--tpvalue when using multiple Sparks
- Value:
gpu_memory_utilization- Value:
0.7 - Why: Safe value for DGX Spark UMA
- Value:
--distributed-executor-backend ray- Value: Ray
- Why: sparkrun automatically detects Ray and sets up the Ray cluster. For TP=1, Ray runs on a single node.
--mxfp4-backend CUTLASS- Value: CUTLASS
- Why: Custom CUTLASS MXFP4 MoE GEMM kernel
--mxfp4-layers moe,qkv,o,lm_head- Value: Full
- Why: All layers are quantized to FP4
--attention-backend FLASHINFER- Value: FlashInfer
- Why: Custom FlashInfer kernel supporting GPT-OSS attention architecture
--kv-cache-dtype fp8- Value: FP8
- Why: Reduced memory usage for the KV cache
--load-format fastsafetensors- Value: Fast loader
- Why: ~41-second model loading time
--reasoning-parser openai_gptoss- Value: Harmony
- Why: Separates the reasoning process into the
reasoningfield
--tool-call-parser openai- Value: Tool usage
- Why: Required for
--enable-auto-tool-choice
Important:
The --rootful flag is not specified in the recipe; it is passed in the launch command.
FlashInfer compiles CUTLASS attention kernels at runtime, and this compilation requires root privileges.
The launch commands are shown in the “Launch the Model” step of the relevant section.
6. Pre-Launch Checks
Verify that `sparkrun` correctly parses the recipe and that the memory budget is appropriate:
sparkrun correctly parsed the recipe, selected vllm-ray, and gave the ‘DGX Spark fit: YES’ confirmation.
Now preview the launch plan:
Dry run successful. The recipe is valid, the serve command includes the flags we added, and it is ready to launch. If the model is not installed on the Spark, sparkrun will automatically download it from Hugging Face on first launch. The GPT-OSS 120B model is approximately 183 GB; download time depends on your internet speed. The dry run does not trigger this download — downloading only happens on the actual launch.
If you are using multiple Sparks, set the --tp value according to the number of Sparks for the TP dry-run (for example, --tp 2 for two Sparks). You will see --tensor-parallel-size 2 in the serve command, and the mode will appear as cluster (2 nodes) instead of solo:
Running with a Single Spark
1. Clearing the Cache
Before starting vLLM, clear the filesystem cache:
The main reason for doing this is the DGX Spark’s unified memory architecture: The operating system caches the model files it reads from disk in RAM. vLLM loads the model weights from here into GPU memory. After loading is complete, the data remaining in the cache is not used again but is not cleaned up immediately. In systems with separate memory, this is not significant. Since inference runs in GPU memory, RAM fullness does not affect performance. On the Spark, however, since the CPU and GPU share the same RAM, the cache reduces the space available to the GPU. The command clears this cache, providing maximum memory for vLLM.
When prompted for a password, enter the Spark’s password. The command produces no output; it completes silently:
2. Launching the Model
Now let’s launch the model:
The --rootful flag runs the container with root privileges. FlashInfer compiles CUTLASS attention kernels at runtime and requires root privileges for this compilation. The --no-follow flag causes sparkrun to return to the command line after launching the containers.
sparkrun successfully completed all 6 steps. Image building was skipped, and the image we built during setup was used. Since the model files were already on disk, distribution completed quickly. All flags were correctly resolved within the serve command.
3. Monitoring the Startup Process
After the model download completes, it may take a few minutes for vLLM to become ready to serve. During this process, vLLM loads the model weights into GPU memory, compiles GPU kernels, and allocates memory for inference.
To monitor the vLLM logs:
You will see the following in the logs:
If you see the Application startup complete. line, the model server is ready. Press Ctrl+C to stop watching the logs. The server will continue running in the background.
4. Testing the Model
First, verify that the server is running:
An ‘HTTP 200’ response indicates the server is healthy. Now check the sparkrun container status:
List the registered models:
The model openai/gpt-oss-120b is registered.
Now test the model with the prompt “What is 12*17?”:
A simplified version of the response is below. In the content field (the model’s answer) you will see 204. From this, you can tell the model performed the multiplication correctly. Additionally, the response has a reasoning field. This field contains the model’s reasoning process. GPT-OSS’s Harmony format is working: the reasoning process and the final answer are presented in separate fields:
vLLM is now running and serving on the Spark’s port 8000. We can ask GPT-OSS 120B questions and get answers.
5. Shutdown
When you are done, stop the model:
This command stops the container and frees up memory. However, the container, the Docker image, and the model files remain on disk. This means you don’t need to re-download to start again. Simply re-run the sparkrun run command from step 2.
Running with Two Sparks
1. Clearing the Cache
Before starting vLLM, clear the filesystem cache on both Sparks. The main reason for doing this is the DGX Spark’s unified memory architecture (UMA): The operating system caches the model files it reads from disk in RAM. vLLM loads the model weights from here into GPU memory. After loading is complete, the data remaining in the cache is not used again but is not cleaned up immediately. In systems with separate memory, this is not significant. Since inference runs in GPU memory, RAM fullness does not affect performance. On the Spark, however, since the CPU and GPU share the same RAM, the cache reduces the space available to the GPU. The command clears this cache, providing maximum memory for vLLM.
Clear the cache on the Main Spark:
Apply the same cleanup on the Worker Spark via SSH from the Main Spark:
2. Launching the Model
Now, let’s launch the model on two Sparks:
The --tp 2 flag tells sparkrun to run the model split (tensor parallel) across two Sparks. The --rootful flag runs the container with root privileges — FlashInfer compiles CUTLASS attention kernels at runtime and requires root privileges for this compilation. The --no-follow flag causes sparkrun to return to the command line after launching the containers. sparkrun automatically synchronizes the image to the Worker (skips if the same ID), copies the model to the Worker (skips if already present), sets up the Ray cluster, configures NCCL for the CX-7 interfaces, and launches containers on both Sparks.
sparkrun successfully completed all 6 steps. The ‘Mode: cluster (2 nodes)’ section was seen. The image was synchronized to the Worker over CX-7. --tensor-parallel-size 2 appears in the serve command. sparkrun detected the --distributed-executor-backend ray flag, selected the vllm-ray runtime, and automatically set up the Ray cluster.
At TP=2, the model weights are split in two — each Spark loads ~30 GB (vs. 61 GB at TP=1). This leaves 35.97 GiB of memory for KV cache on each Spark (vs. 8.46 GiB at TP=1) — meaning more concurrent requests.
3. Monitoring the Startup Process
After the model download completes, it may take a few minutes for vLLM to become ready to serve. During this process, vLLM loads the model weights into GPU memory, compiles GPU kernels, and allocates memory for inference.
Monitor the logs:
You will see the following in the logs:
If you see the Application startup complete. line, the model server is ready. Press Ctrl+C to stop watching the logs. The server will continue running in the background.
4. Testing the Model
Check the container status. Containers should be running on both Sparks:
Both containers are running.
Let’s run a health check on the model:
The model is healthy. Now let’s test the model with a prompt:
The model answered 12 × 17 = 204. Additionally, the reasoning and reasoning_content fields contain the model’s reasoning processes.
The API is served only through the head node (Main Spark). That is, we communicate with the model via the Main Spark. The Worker Spark only participates in the inference computation.
5. Shutdown
When you are done, stop the model. Since you used --tp 2 when launching, you need to specify --tp 2 when stopping as well:
This command stops the container and frees up memory. However, the container, the Docker image, and the model files remain on disk. This means you don’t need to re-download to start again. Simply re-run the sparkrun run command from step 2.
Using with Open WebUI
In the previous tutorial (Local LLM Serving with vLLM on DGX Spark), we set up Open WebUI and connected it to vLLM’s port 8000. The GPT-OSS 120B model is also served from the same port 8000. If Open WebUI is running, it automatically detects the model and lists it as openai/gpt-oss-120b in the model selection menu on the chat screen. You can select the model and start using it from the browser.
Single vs Dual Spark Performance Comparison
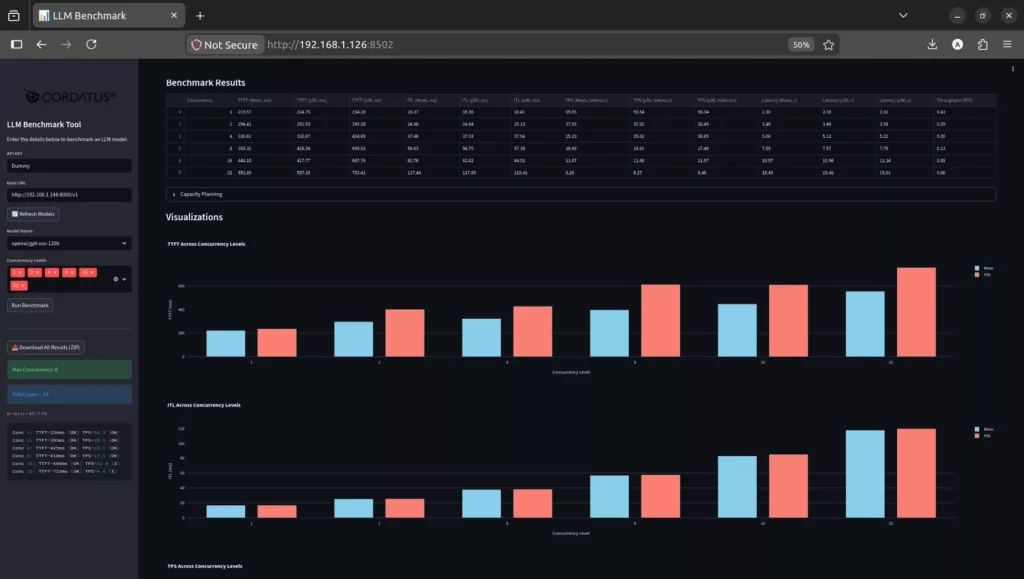
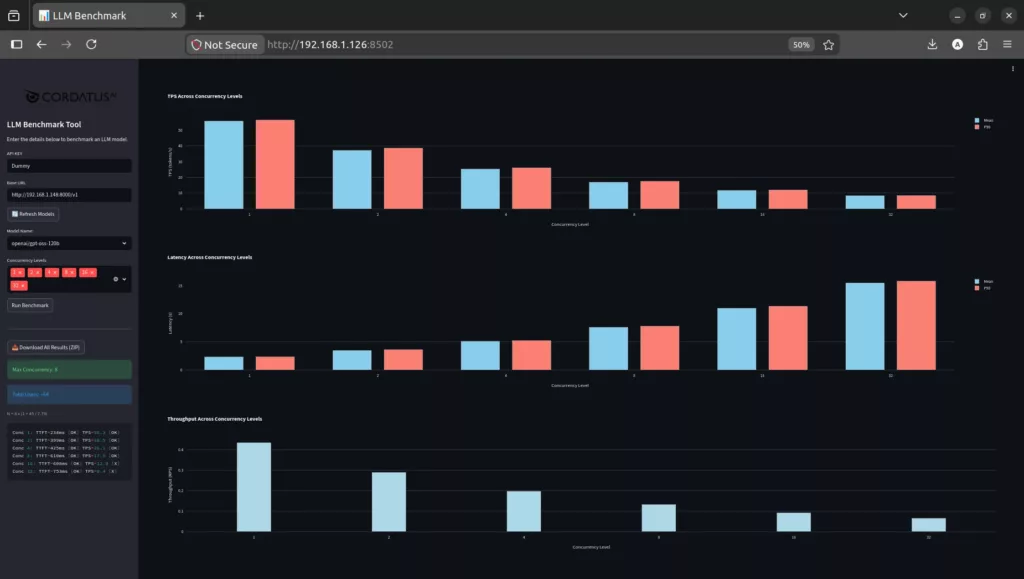
We compared the single Spark (TP=1) and dual Spark (TP=2) configurations at different concurrency levels. The measurements recorded average TTFT (Time to First Token — the time until the first token starts being generated) and TPS (Tokens Per Second — the number of tokens generated per second) values.
| Concurrency | Single Spark TTFT (ms) | Dual Spark TTFT (ms) | Single Spark TPS (tok/s) | Dual Spark TPS (tok/s) | TPS Improvement |
|---|---|---|---|---|---|
| 1 | 219.57 | 167.69 | 55.65 | 69.86 | +26% |
| 2 | 294.41 | 227.76 | 37.05 | 51.52 | +39% |
| 4 | 320.61 | 255.41 | 25.20 | 37.14 | +47% |
| 8 | 395.31 | 291.94 | 16.88 | 26.92 | +59% |
| 16 | 444.10 | 319.99 | 11.67 | 19.08 | +63% |
The dual Spark setup provides 26% higher token throughput at concurrency 1 (single user), and as concurrency increases, this gap grows, exceeding 60% at concurrency 16, as shown.
The measurements were taken using the CordatusAI LLM Benchmark Tool. This tool is a benchmarking application developed by CordatusAI that tests LLM servers with OpenAI-compatible APIs. Below are screenshots of the benchmark results the application produced for our model. As can be seen, the application can test at concurrency levels from 1 to 64, and at each level it measures TTFT, ITL, TPS, latency, and throughput metrics, presenting the results as tables and graphs. It also calculates the recommended number of users the system can support. This calculation is a general estimate based on certain assumptions and does not reflect all usage scenarios. As seen in the image, the tool calculated a recommended user count of 55 for a single Spark and 120 for dual Sparks.
Single Spark benchmark results:
Double Spark benchmark results: